Every time when diving, see the diving guide or the coach's leisurely swim in the front, the legs are almost completely fixed, but only occasionally kicked easily and effortlessly, it completely overtakes me this non-stop kicking, tired whirring The straight-breathing students were extremely envious in their hearts until they asked the coach in Sheung Shui. They were told that the kick was a frog kick.
Why do you want to frog kick?
The benefits of frog kicking
Because the frog kicks forward power, it makes the diver very easy
More comfortable and balanced when swimming
If the movement is accurate, frog kicking can reduce the tension in the thighs, knees and ankles.
No downward flow will occur and the bottom sludge will not be agitated. Suitable for all diving, especially when sinking and digging.
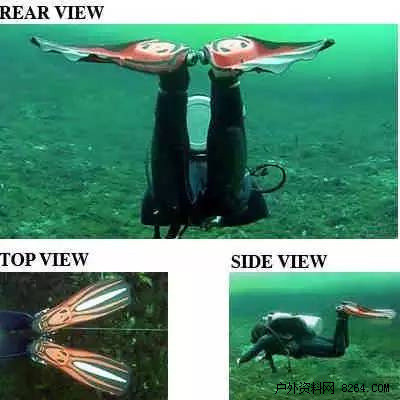
The first step: starting position
The first step in the frog kick is to assume that the starting position is as shown above. The diver should be level in the water and the knee bent upwards by 90°. His ankle should be parallel to the ground. His knees and ankles are in a plane.
To maintain this position, Trim, the diver may find it helpful to look forward, slightly arching back, hips forward, arms in front of the body.
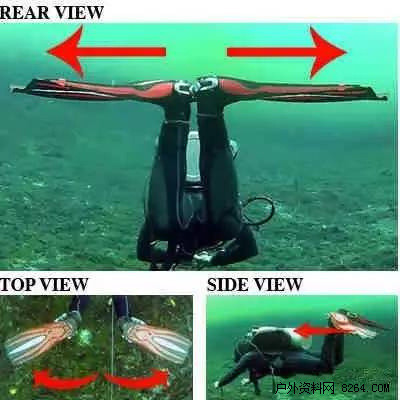
The second step: open the ankle
After the diver remains in the starting position, the next step is to separate his ankles to both sides. This kind of kick mainly depends on the diver's ankle. The diver simply uses his ankle to rotate the ankle outward while keeping his ankle parallel to the ground. If done correctly, the thin edge of the ankle gently slides across the surface without significant resistance.
*Note: The diver's knee can be a little bit apart and he may feel that the hips are turning slightly. This is actually true - frog kicks should not feel stiff or uncomfortable. However, the diver should avoid that his legs and knees are too large to open, which does not help kick the water and is also very tired. And it may lead to accidental encounters with corals or other structures.
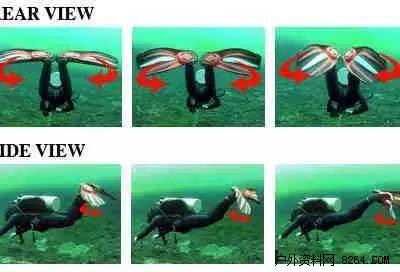
Step 3: Push forward
The diver's feet forcefully put the ankle and the bottom of the feet together behind the body. The diver's ankles swiveled slightly and the knees slightly stretched, causing the ankle to fall slightly. Correctly, the diver's foot will be from the "bent" position shown in step 2 to the "toe-to-tip" position. Focus on pushing the water with the power of his legs and ankles.
The method of kicking is slow and powerful. Fast and unstable kicks produce very little force and make the thighs uncomfortable. Should relax, to avoid stiff legs and ankles. To feel the kick of the ankle is a natural extension of the frog kick.
Finally, it is essential that divers maintain his physical core position. The back arched, the hips pushed forward and the arms extended. Look forward. The diver should pay attention to maintain the upper body position to maintain a strong torso strength, in order not to fall off his knees or bend his waist when he is kicking.
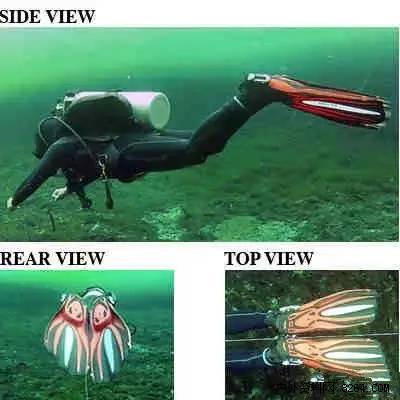
Step 4: Glide (the most comfortable moment)
After the push, the diver's legs stretched and his knees slightly straightened. Together with the fins, the feet pose perfectly, keeping the streamlined position sliding in the water. Stay gliding in the water for a while. This is a relaxing step and a purely forward movement. Don't feel too good!
If the diver returns to the starting position immediately after step 3, he will interrupt the forward taxiing to slow down or prematurely stop. Keep the frog kicking for a while, then slowly bring your heel up and the ankle to relax back to the starting position.
Now you know the basics of frog kicking. Once you have mastered these four steps, remember that every step is smooth, slow and relaxed. This may require a little more practice to master, and it is worth working hard to learn this kind of play. You will be more relaxed underwater. Once you have mastered, I promise you never want to play again!
AUTRENDS INTERNATIONAL LIMITED , https://www.petspetscleaning.com